PLEASE 'LIKE' MY PAGE ON FACEBOOK - THANK YOU

Friday 28 June 2013

Visible Image - My Friday Design Team Post...

Hello lovelies,
 
Welcome to another Friday and another VISIBLE IMAGE  design team post from me.
 
Last week was so exciting seeing the fabulous VISIBLE IMAGE STAMPS on Create & Craft TV being demonstrated by the talented Mark and Cheremane. It was a fantastic show and the demos were brilliant, and showed you all just how easy it is to use the VISIBLE IMAGE STAMPS and the excellent quality of them too.
 
Myself and the rest of the design team made lots of samples for the show. My project for this week is to share one of my samples with you that I made.
 
For my card sample I used the MOLLY SET for my A5 card...
 
 
The other materials I used are...
 
Letraset Promarkers in shades: Skin: Almond ~ Putty ~ Pastel Pink ~ Sunkissed Pink
Hair: Blossom ~ Rose Pink ~ Fuchsia Pink ~ Cerise
Clothes: Pink Carnation ~ Mulberry ~ Ice Grey 3 ~ Ice Grey 5 ~ Cool Grey 4
Bear: Ice Grey 2 ~ Cool Grey 3
Outline: Ice Grey 2
Memento Ink Tuxedo Black
Distress Ink Worn Lipstick
Black, pink and grey ribbons.
Pink Card
Foam Pads
 
To make this, I used the stamps to create the backgrounds and borders onto card.
I stamped Molly and coloured her in. I then punched holes around the edges of the cut out image and threaded the ribbons as shown.
I matted and layered everything together and then finished with the wording stamped onto card and attached with foam pads.
 
I love this stamp set!
 
Have a look at some of the stamp sets from the show still available to buy at CREATE & CRAFT
 
Also hop over to the VISIBLE IMAGE GALLERY to see lots of inspiration from the design team using the gorgeous stamp sets that were on the show.


Visible Image Blog Badge, Blinkie
 
Don't forget to join in the VISIBLE IMAGE JULY CHALLENGE WHICH STARTS ON 1ST JULY  It's a fabulous theme, I just know you will love it!
We would love to see your creations for this, you never know you could be the lucky winner who receives £10 to spend on VISIBLE IMAGE STAMPS 
PLEASE NOTE: YOU MUST USE A REAL STAMP NO DIGIS ALLOWED!
 
More exciting news too.... the July issue of Craft Stamper magazine has a FREE stamp that Mark has designed. Some of the design team got inky with it. Make sure you buy your copy!
 
Finally, don't forget we have the VISIBLE IMAGE FACEBOOK GROUP which you can join by clicking on the link. It's a fun group with lot's of inspiration using the fabulous VISIBLE IMAGE STAMPS 
 
I am entering this card into the following challenges...
 
 
Thanks for stopping by today, till next time...
 
Happy Stamping,
Lots of love
Nicola XXX

Friday 21 June 2013

VISIBLE IMAGE - MY FRIDAY DESIGN TEAM POST....

Hello lovelies!
 
Well it is with great excitement I bring my post to you today, because tomorrow is the day that
 
 
will be on your TV screens on
 
 
with the lovely Mark and Cheremane doing fabulous demos!
 
So, set your sky + reminder to record the show if your going out. If you will be watching the show at 10am get yourself comfy, and settle down to watch an hour of brilliant stamping demos with the fabulous, excellent quality VISIBLE IMAGE STAMPS 
 
You will absolutely love the stamps available for you to buy. I have had the pleasure of making some samples using the gorgeous VISIBLE IMAGE STAMPS that will be available for you to buy from CREATE AND CRAFT 
 
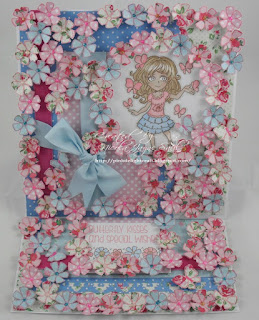
My design team project I want to share with you this week is one of my samples that I have made for the show. I have used the KATIE STAMP SET which I absolutely loved using. I love pretty and cutting out pieces of paper. You will see just how much I love cutting out when you see all my stamped flowers, all 96 of them! LOL
 
Here is my sample using the EXCLUSIVE NEW KATIE STAMP SET 
 
06-20-2013
 
The other materials you will need for this easel card are...
 
~ Letraset Promarkers in shades - Skin: Putty - Almond - Sunkissed Pink - Coral
Eyes: Powder Blue
Hair: Satin - Sandstone - Caramel - Cinnamon
Clothes and shoes: Baby Pink - Cocktail Pink - Salmon Pink - Arctic Blue - Powder Blue
Outline: Warm Grey 1
~White card
~ 8"x8" white card blank x 2
~ Patterned paper - I used Creata papers
~ Memento Ink Rich Cocoa
~ Distress Ink Worn Lipstick
~ Blue Ribbon
~ Butterfly Border punch
~ Stickles Glitter Glue in Diamond - Glam Pink - Turquoise - Fruit Punch
 
To make this...
 
~ Create your easel card from your two card blanks.
~ Stamp Katie onto white card with the brown ink and colour with your pens.
~ Stamp 96 flowers from the set using the Worn Lipstick ink onto co-ordinating patterned paper, cut out. Add dots of stickles using the colours listed to the centres and set aside to dry.
~ Cover the easel front with papers as shown, stamp a butterfly border down one side of paper and wrap a length of ribbon around the opposite edge, attach the card.
~ Die-cut a circle, or if you don't have a circle die, use a pencil to draw round your double sided tape and cut this out. Glue flowers around the edges to create a border.
~ Add a ribbon bow as shown.
~ Stamp the Butterfly Kisses sentiment onto white card using the Worn Lipstick Ink, stamp the flower border below this and colour with your pens. Mat and layer and then use foam pads to attach to the easel base to create the easel stopper.
~ Use the butterfly border punch to create a border for the easel base as shown.
~ Starting from the top left corner, glue the flowers working them along in a pattern towards the right top corner, down to the bottom right corner and so on to create a flower garland effect.
~ To finish, stamp 3 butterflies from the set onto patterned paper and cut out, attach randomly on the card, and finish with the stickles.
 
I absolutely love flowers, and even if I did go a little mad with them, I think they look very pretty!
 
are excellent quality, I know you will love using them.


Visible Image Blog Badge, Blinkie
 
Make sure you order your stamps and email in the show too on Saturday 22nd June at 10am to say hello! Send your emails when the show is on to studio@createandcraft.tv Add this to your email address book to save time on the day, and get your emails in. Mark and Cheremane would love to here from you all on the day. Show VISIBLE IMAGE  some love by saying hello!
Click HERE to join the event on Facebook.
 
Don't forget to join in the VISIBLE IMAGE JUNE CHALLENGE  it's a brilliant theme and it certainly has 'Character'! LOL
We would love to see your creations for this, you never know you could be the lucky winner who receives £10 to spend on VISIBLE IMAGE STAMPS 
PLEASE NOTE: YOU MUST USE A REAL STAMP NO DIGIS ALLOWED!
 
More exciting news too.... the July issue of Craft Stamper magazine has a FREE stamp that Mark has designed. Some of the design team got inky with it. Make sure you buy your copy!
 
Finally, don't forget we have the VISIBLE IMAGE FACEBOOK GROUP which you can join by clicking on the link. It's a fun group with lot's of inspiration using the fabulous VISIBLE IMAGE STAMPS 
 
So, a very busy and exciting time ahead for us all!
Keep watching as there will be lot's of exciting things happening in our world!
 
I am entering my Katie card into the following challenges...
 
 
Happy Stamping,
lots of love
Nicola XXX
 

Friday 14 June 2013

VISIBLE IMAGE - MY FRIDAY DESIGN TEAM POST....

Hello lovelies!
 
Here we are another Friday, wow these come round quickly!
 
Anyway as it's Friday that means another VISIBLE IMAGE design team post from me.
 
I wanted to make a really cheery card today with a bright colour and also play with my new Big Shot die-cutting machine which I absolutely love!
 
The stamps I have used for the card I have made are all from the gorgeous
 
 
Here is my card...
 
6-12-2013
 
The other materials and tools needed to make this card are...
 
~8"x8" scalloped card blank
~ DMC Thread Rose VY DK 326 and Antique Blue LT 932
~ Pokey tool and piercing mat
~ Creata Paper pad Die-cut and cardboard patterns - one dotty sheet and one patterened.
~ Sanding tool
~ Collall all purpose glue
~ Tim Holtz Distress Inks Worn Lipstick and Broken China
~ Memento Ink Tuxedo Black
~ Pinflair Silicon Glue
~ Sizzix Medallions die-cut set
~ Sizzix Basic Shapes die-cut set
~ Fabric scrap
~ Tim Holtz Distress Embossing Ink
~ Clear Embossing Powder
~ Heat Gun
~ Bone folder
~ Red Gingham Ribbon
~ 3 Pearl Head Pins
~ Mini Cotton Spool
~ 3 Red Heart Buttons
~ Corner Chomper
~ White Card Scrap
~ Self-adhesive Pearls
 
How to make...
 
~ Using your pokey tool and piercing mat, pierce holes in each scallop.
~ Use the rose thread and sew a running stitch along the scallops. Use the blue thread to do the same stitch in the spaces left from the first set of stitches.
~ Cut the red dotty paper to 7"x7". Use the sanding tool to sand all the edges.
~ Ink the edges with the Worn Lipstick and also the scalloped edges.
~ Pierce holes down one side and stitch blue thread along this.
~ Glue to the card blank with the Collall so it is at an angle.
~ Cut the patterned paper to 6"x6". Sand the edges and ink with the Broken China. Pierce holes to the right hand side and use rose thread to sew a border.
~ Glue using the Collall over the red dot paper at an angle as shown.
~ Using the black ink stamp the tape measures onto red dot paper. Cut out, sand and ink the edges with Worn Lipstick.
~ Attach at the bottom to create a border. Roll one end over so you see the other decorated side. Attach the other stamped tape measure over lapping the first one.
~ Die-cut the Medallion from patterned card, and also the hearts, one large from patterned card and one large and one small from the fabric scrap.
~ Glue the hearts in the bottom right corner and top left corner as shown.
~ Use the Pinflair glue to attach the medallion at the end of the tape measure.
~ Stamp the button from the SEWING ROOM SET . Pierce 4 holes and add thread.
~ Glue to the centre of the medallion.
~ Stamp the dress makers dummy onto patterned paper using the embossing ink. Sprinkle with the clear embossing powder and melt with your heat gun. When cool, cut out carefully.  Ink the edges with the Worn Lipstick and curve it slightly with the bone folder.
~ Tie the Gingham ribbon around the base as shown. Use the Pinflair to attach it to the card blank so it is slightly raised.
~ Stamp the cotton reel onto the red dot paper using the Broken China ink. Cut out just the reel part and wrap rose thread around it, glue to the card as shown. Stick the  3 pearl head pins into the threaded spool.
~ Wrap the blue thread around the mini spool and glue next to the red one.
~ Thread the 3 heart buttons with blue thread and glue down the right hand side of the card.
~ Stamp the 'Friends' Sentiment onto the white card using Worn Lipstick ink. Cut the ends to points, use the chomper to round the two corners as shown. Ink the edges.
~ Stamp the running stitch and zig zag stitch along the top and bottom of the sentiment using Broken China ink. Matt onto blue paper, round the corners and ink edges as before. Cut the ends to points. Matt this onto red dot paper and round corners and ink edges again, cutting ends to match the others. Punch a hole in the middle of the points and thread the ribbon through, use silicon glue to attach to the card so it is raised.
~ To finish, add the pearls as shown.
 
Phew, a lot of instructions but worth the effort! LOL I absolutely love the SEWING ROOM SET
You can make so much with it. To see more ideas and inspiration hop over to the VISIBLE IMAGE GALLERY  where you will see lot's of design team creations!
 
While you are there make sure you browse through the gorgeous VISIBLE IMAGE STAMPS
I love working with them the quality is excellent, they are so easy to use, they ink evenly and give good clear, crisp results every time.


Visible Image Blog Badge, Blinkie
 
VISIBLE IMAGE will be appearing on Create & Craft TV on Saturday June 22nd at 10am.
Make sure you mark the date in your diary, on your calendar, a post it note or wherever you like to put your reminders for things. Believe me you WILL NOT WANT TO MISS THIS! I have had the pleasure of making some of the samples, and along with the rest of the VISIBLE IMAGE DESIGN TEAM we can't wait for you to see them. Make sure you order your stamps and email in the show too on the day to say hello! Send your emails when the show is on to studio@createandcraft.tv Add this to your email address book to save time on the day, and get your emails in. Mark and Cheremane would love to here from you all on the day. Show VISIBLE IMAGE  some love by saying hello!
Click HERE to join the event on Facebook.
 
If you are going out, or will be working hit that record button so you don't miss the fabulous demos!
 
Now....a couple of more reminder's....don't forget to join in the VISIBLE IMAGE JUNE CHALLENGE  it's a brilliant theme and it certainly has 'Character'! LOL
We would love to see your creations for this, you never know you could be the lucky winner who receives £10 to spend on VISIBLE IMAGE STAMPS 
PLEASE NOTE: YOU MUST USE A REAL STAMP NO DIGIS ALLOWED!
 
More exciting news too.... the July issue of Craft Stamper magazine has a FREE stamp that Mark has designed. Some of the design team got inky with it. Make sure you buy your copy!
 
Finally, don't forget we have the VISIBLE IMAGE FACEBOOK GROUP which you can join by clicking on the link. It's a fun group with lot's of inspiration using the fabulous VISIBLE IMAGE STAMPS 
 
So, a very busy and exciting time ahead for us all!
Keep watching as there will be lot's of exciting things happening in our world!
 
I am entering my card into the following challenges...
 
 
 Thank you for stopping by today, as always I do appreciate your visits and if you leave me some love, I am thankful for that too.
 
Have fun and happy stamping,
lots of love
Nicola XXX

Monday 10 June 2013

Pink and Sweet....

Hello lovelies!
 
I hope you are all keeping well. I have had a busy day today, making some design team projects.
The project I have just made tonight though I have made especially to enter into some challenges. I decided to make a list of the one's I wanted to enter today, I wrote down the themes. I went through my crafty stash picking out the bits and pieces I would need to make sure I could enter the challenges I chose.
 
So, with all my gorgeous supplies around me, here is what I made...
 
 
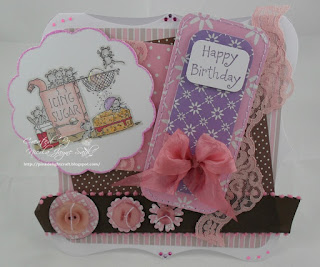
The stamp I have used is Lili of The Valley ~ Sprinkled With Sugar
 
I have used Letraset Promarkers to colour it in shades of...
 
Ice Grey 1 ~ Warm Grey 1 ~ Warm Grey 2 ~ Warm Grey 3 ~ Pale Pink ~ Pastel Pink ~ Sunkissed Pink ~ Dusky Rose ~ Orchid ~ Amethyst ~ Cardinal Red ~ Crimson ~ Caramel ~ Tan ~ Apricot ~ Honeycomb ~ Coral
 
The other materials used are...
 
~ DMC Thread Lavender Lt 211
~ Creata Die-Cut & Cardboard pads
~ Distress Ink Dusty Concord
~ Happy Birthday Stamp
~ Die cut circles
~ Scallop die
~ Pink Glitter
~ Quickie Glue pen
~ Lace
~ Ribbons
~ Buttons
~ Stickles glitter glue in shades Diamond and Glam Pink
~ Self adhesive gems
 
I have matted and layered lots of the paper's as you can see. I have added lace and ribbons, to co-ordinate with the papers. I love all of these colours together. When I look at the card it reminds me of the colours of Neapolitan ice-cream!
 
I am entering my card into the following challenges...
 
 
Well, I loved making this card. I will save it for a crafty friends birthday!
 
Thank you for stopping by I always appreciate your visits.
 
Till next time,
happy crafting,
lots of love
Nicola XXX


Friday 7 June 2013

VISIBLE IMAGE - MY FRIDAY DESIGN TEAM POST....

Hello lovelies!
 
Well it's Friday again which means another VISIBLE IMAGE design team post from me.
 
This week I wanted to make a card using flower's. I absolutely love roses so I just knew the perfect stamp set to use for my card this week. I may even have gone a little over board with them, but I love love love them!
 
To create my card this week I have used the following stamps...


Here is my IMMORTAL LOVE ROSE  card I have made...
 
 
To buy the stamps just click on the links above to be taken directly to them, or click HERE to be taken to the full selection of VISIBLE IMAGE STAMPS


Visible Image Blog Badge, Blinkie
 
The other materials needed to make this card are...
 
~ 8x8 card blank
~ Memento Ink Rich Cocoa
~ Tim Holtz Distress Inks: Scattered Straw - Worn Lipstick
~ Double Sided Patterned Papers: I have used a Die-Cut & Cardboard Patterns Pad from Creata.
~ Ribbon
~ Ranger Stickles in Diamond
~ Word Brad 'Flowers'
~ Double-sided tape
~ Pinflair
 
How to make...
 
~ Stamp a row of 4 large ROSES on one of the double sided patterned sheets. Cut this strip out. Stamp a row of 5 small ROSES on the same sheet, cut this strip out.
~ Turn over and stamp the same amount of roses as on the other side.
~ Repeat the same pattern of stamping the roses with the second sheet of double sided paper.
~ In total you will have 16 large roses and 20 small roses. Fussy cut them all out.
 
 
~ Ink all the edges using the Worn Lipstick Distress Ink on the pink roses and the Scattered Straw on the others. Leave 3 small roses to one side.
~ Cover the 8x8 card blank with patterned paper, making sure a decorative pattern is just placed in the bottom right corner.
~ Lay your roll of double-sided tape on the card blank in the centre. Draw around the outer edge of the tape with a pencil.
This is now your guide for arranging the roses in a circle.
~ Use your double sided tape to attach a length of ribbon to the left of the card.
~ Use the silicon glue to arrange the large roses first to build up the garland. Then, continue to build up the garland with the small roses as shown.
Manipulate the flowers as you lay them to add some extra shape and create a 3d look.
~ Make a ribbon rosette using the word brad and stick to the top of the ribbon.
~ Stamp WITH and then the LOVE underneath onto some co-ordinating paper. Cut out, round the corners and use silicon glue to attach it in the centre of the garland making sure it is raised away from the card blank.
~ Stamp one LARGE BUTTERFLY and two SMALL BUTTERFLIES onto the patterened paper and attach to the card as shown using the silicon glue.
To finish add the three roses on top of the ribbon you set to one side earlier, and finish with a little dot of the stickles in the rose centres and in the centres of the flowers on the paper.
 
I absolutely love these roses from the IMMORTAL LOVE SET I think they look lovely cut out and made into a garland.
 
The VISIBLE IMAGE stamps are excellent quality. I love working with them, you get crisp, even stamping results every time. You will love using them. Make sure you hop over to the VISIBLE IMAGE WEBSITE to have a look at all the gorgeous stamps available. Why not treat yourself and pop a few in your basket while you are there. Check out the VISIBLE IMAGE GALLERY for inspiration. So many gorgeous projects for you to look at.
 
VISIBLE IMAGE will be appearing on Create & Craft TV on Thursday June 20th at 11am.
Make sure you mark the date in your diary, on your calendar, a post it note or wherever you like to put your reminders for things. Believe me you WILL NOT WANT TO MISS THIS! I have had the pleasure of making some of the samples, and along with the rest of the VISIBLE IMAGE DESIGN TEAM we can't wait for you to see them. Make sure you order your stamps and email in the show too on the day to say hello! Send your emails when the show is on to studio@createandcraft.tv Add this to your email address book to save time on the day, and get your emails in. Mark and Cheremane would love to here from you all on the day. Show VISIBLE IMAGE  some love by saying hello!
 
If you are going out, or will be working hit that record button so you don't miss the fabulous demos!
 
Now....a couple of more reminder's....don't forget to join in the VISIBLE IMAGE JUNE CHALLENGE  it's a brilliant theme and it certainly has 'Character'! LOL
We would love to see your creations for this, you never know you could be the lucky winner who receives £10 to spend on VISIBLE IMAGE STAMPS 
PLEASE NOTE: YOU MUST USE A REAL STAMP NO DIGIS ALLOWED!
 
More exciting news too.... the July issue of Craft Stamper magazine out this week has a FREE stamp that Mark has designed. Some of the design team got inky with it. Make sure you buy your copy!
 
Finally, don't forget we have the VISIBLE IMAGE FACEBOOK GROUP which you can join by clicking on the link. It's a fun group with lot's of inspiration using the fabulous VISIBLE IMAGE STAMPS 
 
I am entering my card into the following challenges...
 
 
Well I hope you have enjoyed your visit today. Thank you for taking the time to stop by each week and see what I have been creating. I always appreciate your visits.
 
Till next time,
 
Happy Stamping!
 
Lots of love
Nicola XXX


Monday 3 June 2013

Playing with Paper...

Hello lovelies!
 
Well this afternoon I have been playing with my new paper pads that I bought last week from Creata

I absolutely love my new paper pads, the colours are so gorgeous. I have used one of the die-cut & cardboard patterns pad to make a birthday card for my friend.

I wanted to keep it fairly simple but very pretty. I have used a Joy Vintage border die too.

 
I love these colours together.
 
I sometimes like to make very simple quick and easy cards. It's handy when your short on time and also you don't have as much clearing up to do after!
 
Thanks for stopping by, till next time..have fun...
 
lots of love
Nicola XXX


Sunday 2 June 2013

CRAFTING MUSKETEERS...JUNE CHALLENGE...

Hello lovelies!
 
Welcome to the June challenge from the
 
 
We had a fabulous response to the first challenge which was launched last month. We do hope you will join us again for this month's challenge which is sponsored by
 
 
With a fantastic prize...this is what you could be in with a chance of winning!


The theme for this month's challenge is...
 
'STAMPED IMAGE'
 
So, dig out your stamps...we want to see a stamped image on your creations!
 
I have made an easel card for my design team project for this theme. I was commissioned to make a wedding card for a gothic wedding so I thought it would also be perfect for this theme too.
 
Here is my card...
 
 
To make my card I have used Kanban Jasper Stamps. I used the masked stamping technique.
 
The border is stamped using the straighter edge of the
 
 
from
 
 
I used Distress Ink Dusty Concord.
 
The images I coloured with Letraset Promarker's in shades:
 
Orchid ~ Amethyst ~ Purple ~ Slate ~ Lavender ~ Cool Grey 1 ~ 2 ~ 3 ~ 4 ~ 5 ~ Black ~ Almond ~ Putty ~ Sunkissed Pink.
 
I have personalised the wedding card with the names of the couple and the date of the wedding.
 
We would love to see your creations for this challenge, so hop over to the CRAFTING MUSKETEERS CHALLENGE BLOG  to see the rest of the design team creation's!
 
I am entering my card into the following challenges...
 
 
Thanks for stopping by today, I always appreciate your visits.
 
Have fun and happy crafting,
lots of love
Nicola XXX


Saturday 1 June 2013

VISIBLE IMAGE - JUNE CHALLENGE...

Hello lovelies!
Wow, the month's are flying by. The 1st of June already, which means we also have the longest day this month too! Let's hope we get some summer before then!
It is  time for the VISIBLE IMAGE JUNE CHALLENGE too which is a fab theme...
 
 
Which means you must use a character stamp. The character stamp can be one you have in your stash already, but if you do have a VISIBLE IMAGE CHARACTER STAMP it would be brilliant if you could use it. If you fancy buying one of the character stamps, just click on the link to be taken to them.
 
Before I show you my card don't forget you could be in for a chance of winning £10 to spend on VISIBLE IMAGE STAMPS if you are randomly selected as the winner of the challenge. Also I would like to remind you all that you MUST USE an actual stamp and NOT a digital stamp!


Visible Image Blog Badge, Blinkie
 
 
' Visible Image Has Character' card...
 
 
You can be taken directly to the stamps by clicking on the links above.
 
The other materials needed to make this are...
 
~ White card for stamping onto
~ Kraft Card
~ Kraft Card DL Card Blank
~ Memento Ink Rich Cocoa
~  Tim Holtz Distress Ink Frayed Burlap
~ Blending Tool
~ Letraset Promarkers in shades: Skin - Almond ~ Putty ~ Pastel Pink ~ Coral
Hair - Blush ~ Saffron ~ Spice ~ Apricot
Clothes - Vanilla ~ Mustard ~ Honeycomb ~ Burnt Orange
Eyes: ~ Spice
Skateboard: ~ Cinnamon ~ Cocoa
Outline: ~ Warm Grey 1
~ Craft knife
~ Bone folder
~ Double sided tape
~ Pinflair Glue
 
How to make...
 
~ Lay your kraft card blank on your craft mat with the fold at the top. Ink up the BRICK WALL STAMP  with the Rich Cocoa ink and stamp across the bottom length of the card to create the background.
~ Stamp the GOOD LUCK from the MORE THAN WORDS SET at an angle across the top as shown.
~ Stamp JAKE  onto the white card and colour with the Promarkers. Use your craft knife and carefully cut out, making sure you cut in between the arms and legs.
~ Stamp the BRICK WALL  onto kraft card stamping twice next to each other to create a length of wall. Use your bone folder to curve the middle of the wall so it juts out. Secure the flat ends of the wall to the card blank as shown, making sure your curved part is away from the base.
~ Stamp the brick wall again and this time cut out separate bricks and glue to each end of the wall as shown to create texture.
~ Use the frayed burlap and the blending tool to ink around the edges of the card.
~ Finally, cut a small oblong of kraft card, fold the edges over to create 2 flaps. These will be your supports to hold Jake upright. Use Pinflair to stick one flap to the card base and the other flap to Jake's back. Add a small amount of glue just under the skateboard to secure Jake to the wall.
 
I think JAKE  looks really cool skating along the wall!
 
Myself and the rest of the VISIBLE IMAGE DESIGN TEAM are really looking forward to seeing all your creation's, so get stamping!

Don't forget too that you can also join the VISIBLE IMAGE FACEBOOK GROUP just click on the link to be taken straight to it. We are all really friendly and you will see lot's of inspiration using the VISIBLE IMAGE STAMPS .

Talking of inspiration, don't forget to look at the VISIBLE IMAGE GALLERY where you can see lot's of gorgeous creation's made with all the gorgeous stamps.

Check out the gorgeous new character stamp too CLARA a perfect partner for EDGAR .
 
I am entering my VISIBLE IMAGE JAKE CARD into the following challenges...
 

Thank you for stopping by today and I look forward to seeing your beautiful creation's for the


Have fun and happy stamping,
lots of love
Nicola XXX